Thank you very much for purchasing our Script.
Good luck in using it on your website!
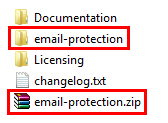
Please extract the script download package (the file named email-protection-php-script.zip). Within the script package you will find the following files and folders:
- Documentation - the folder with the user documentation
- email-protection - the script folder for FTP uploading
- Licensing - the folder with licensing information
- changelog.txt - the file with version history
- email-protection.zip - the script zip file
There are basic steps to install the Script:
- Extract (unzip) the file email-protection-php-script.zip that you have downloaded after purchasing the Script. This main zip file contains the folder named email-protection.
- Using a FTP client (for example FileZilla) to access your host webserver, upload the folder email-protection to any folder of your website (for example, you can upload it to the root folder).
That's all, now the Script is installed, and you can start to configure it.
The script configuration is controlled using the Admin Panel.
There are basic steps to log in to the Admin Panel and to access the Script Settings:
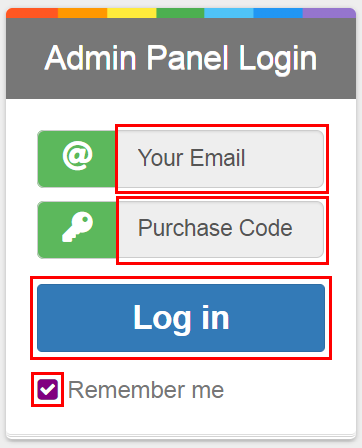
- Open this URL in your browser (in URL yourwebsite.com replace with the real domain of your website):
http://yourwebsite.com/email-protection/login.phpHere /email-protection/ is the path to the Script folder on your webserver. For example if the Script is installed in the root folder, it will be
http://yourwebsite.com/email-protection/login.phpIf the Script is installed in a subfolder of the /your-folder/ folder, it will be
http://yourwebsite.com/your-folder/email-protection/login.php
- In the opened login form enter your email address and your purchase code in the corresponding fields (the entered email address must be exactly the same email address that you provided when you purchased the Script, and the purchase code is the code that you received when you purchased the Script). If you want to store the values of these fields (so do not enter them each time), you should check the checkbox "Remember me" at the bottom of the login form. Then click the "Log in" button.
After that (if the entered email address and purchase code are valid) the Settings page will be automatically opened (in the Admin Panel), and you can configure the Script according to your preferences.
If you want to log out of the Admin Panel, you should click the "Log out" button at the top right corner.
![]()
After you configure the Script, you can use it on your website.
For usage of the Script on your website, you should include the main.php file to the beginning of each page (on your website), on which you want to protect email addresses (your page file must have the .php extension; if the file has the .html extension, you should rename it to the .php extension):
include_once('/email-protection/includes/main.php');Here (and below) /email-protection/ is the path to the Script folder on your webserver. For example if the Script is installed in the root folder, it will be
include_once('/email-protection/includes/main.php');If the Script is installed in a subfolder of the /your-folder/ folder, it will be
include_once('/your-folder/email-protection/includes/main.php');If your page starts with <?php tag (or <? tag), you should add this line just after <?php tag (or <? tag), then your result code (at the very beginning of your page) must look like this:
<?php
     include_once('/email-protection/includes/main.php');
     ..........................................
        Here should be the php code that was
        originally on your page before adding
        our line above
     ..........................................
?>
If your page does not start with <?php tag (or <? tag), you should add this line together with <?php ... ?> tag, then your result code (at the very beginning of your page) must look like this:
<?php
     include_once('/email-protection/includes/main.php');
?>
...............................................
     Here should be the code that was
     originally on your page before adding
     our lines above
...............................................
If you need to use the Script in all .php-files of some folder (for example, this folder may be called "some_folder"), you can create a .htaccess file in this folder, and inside this .htaccess file write the following line (if the .htaccess file already exists in your "some_folder" folder, just add the following line to the beginning of your .htaccess file):
php_value auto_prepend_file /home/site/public_html/email-protection/includes/main.phpHere (and below) /home/site/public_html/ is the path to the root folder of your website.
If the Script is installed in a subfolder of the /your-folder/ folder, you should write the following line inside the .htaccess file:
php_value auto_prepend_file /home/site/public_html/your-folder/email-protection/includes/main.php
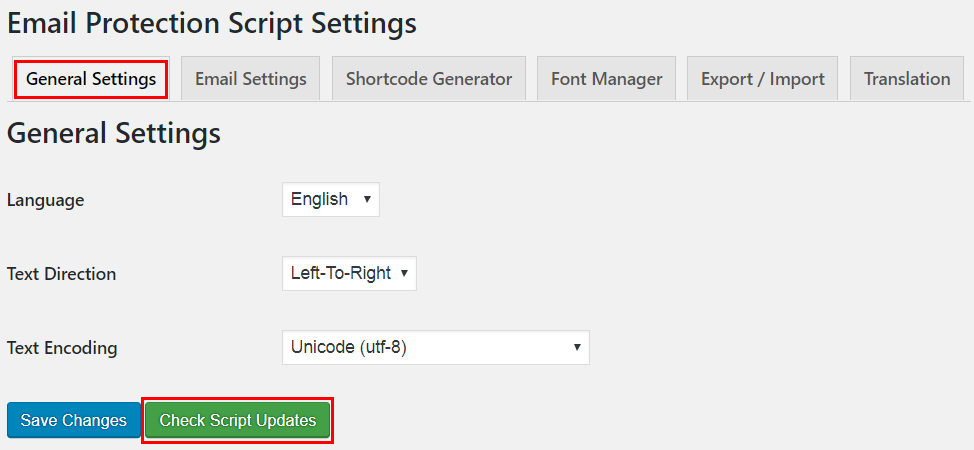
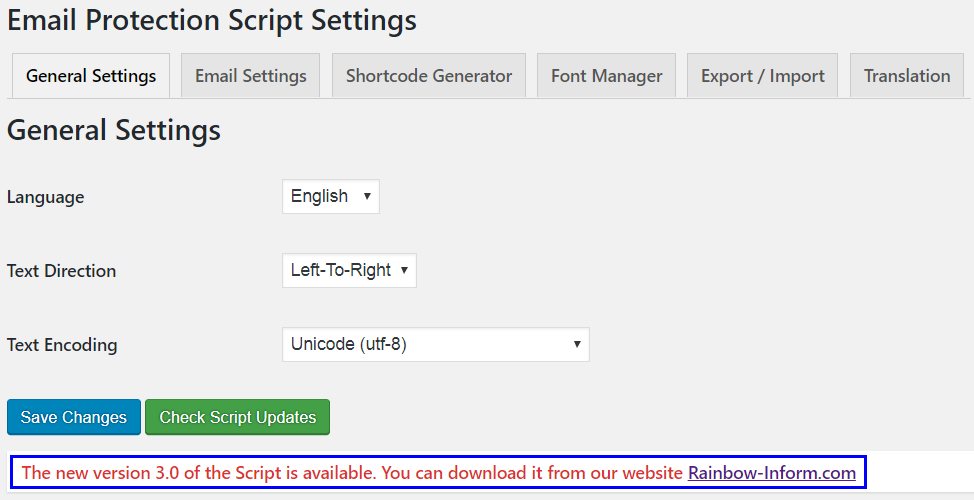
You can check if a new version of the Script is available. To do this, please go to the "General Settings" tab in the admin panel of the Script and then click the "Check Script Updates" button (if you are not logged in the Admin Panel of the Script, please log in as explained above).
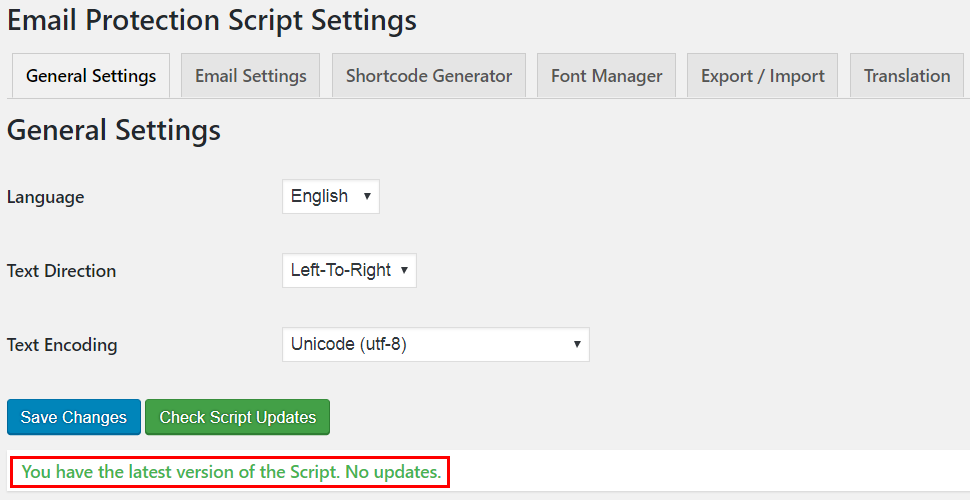
If there are no updates available, the message "You have the latest version of the Script. No updates." will be displayed below.
If a new version of the Script is available, the message "The new version of the Script is available. You can download it from our website Rainbow-Inform.com" will be displayed below.
Please note that updates are available only for customers who have a valid purchase code for this Script. This is the code that you received when you purchased the Script.
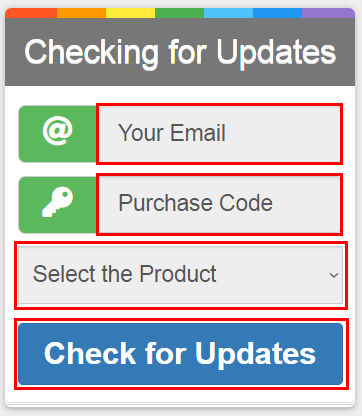
To download the script update, please open this URL in your browser: https://rainbow-inform.com/update.php
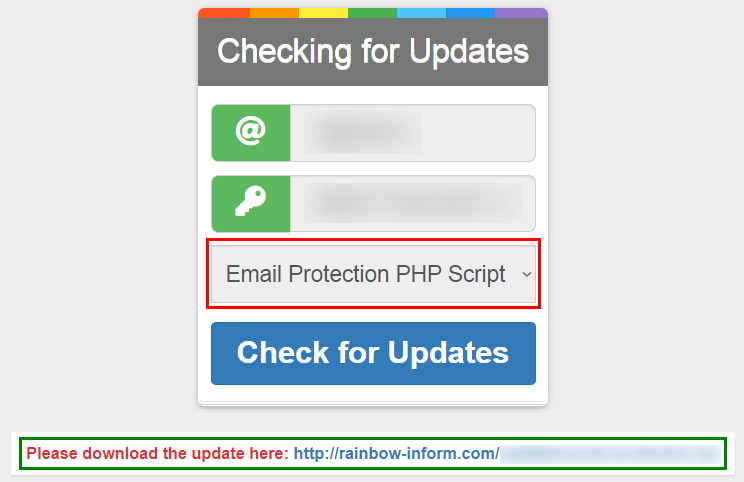
In the opened form enter your email address and your purchase code in the corresponding fields (the entered email address must be exactly the same email address that you provided when you purchased the Script, and the purchase code is the code that you received when you purchased the Script). Select the product "Email Protection PHP Script" from the drop-down list below. Then click the "Check for Updates" button.
If the Script update is available, the message "Please download the update here..." (with the link to the update) will be displayed below. And the window will automatically open to save the update file to your computer. You can also download the update file by clicking on the link from the message that appears below.
NOTE: Before updating the Script please make a backup of the folder that includes your old version of the Script.
There are basic steps to update the Script:
- Download the script update package from our website as explained above (the file named email-protection-php-script.zip).
- Extract (unzip) this downloaded file (the file named email-protection-php-script.zip).
- Using a FTP client (for example FileZilla) to access your host webserver, upload (and overwrite) all files in the folder email-protection (this folder is inside the extracted update package) to the script folder on your host webserver (replacing old files).
That's all, now the Script is updated. Thank you and enjoy the new version of the Script!
The Script is translation ready. Translations into the following languages are already included in the script package: Arabic, Bengali, Chinese (Simplified), Chinese (Traditional), Dutch, English, Finnish, French, German, Hebrew, Hindi, Indonesian, Italian, Japanese, Korean, Norwegian, Persian, Polish, Portuguese (Brazil), Russian, Spanish, Swedish, Thai, Turkish, Vietnamese.
You can translate the Script into other languages (for example into your native language). It is very easy!
There are basic steps to translate the Script:
- If you are not logged in the Admin Panel of the Script, please log in as explained above.
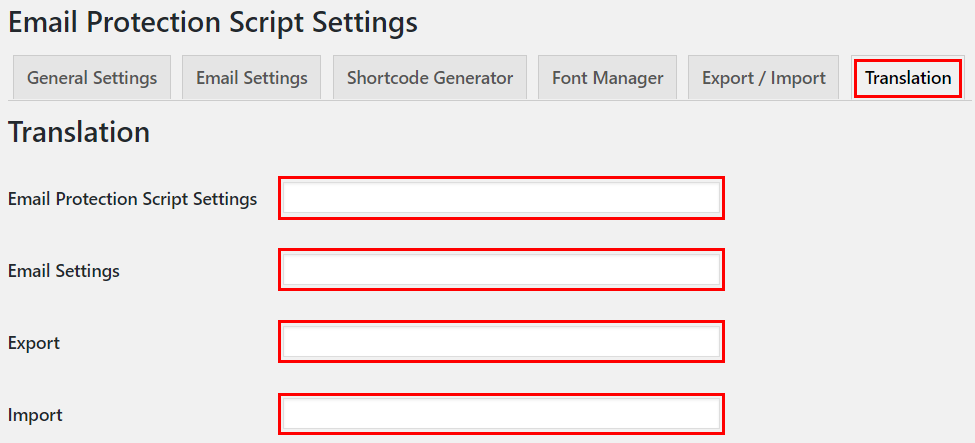
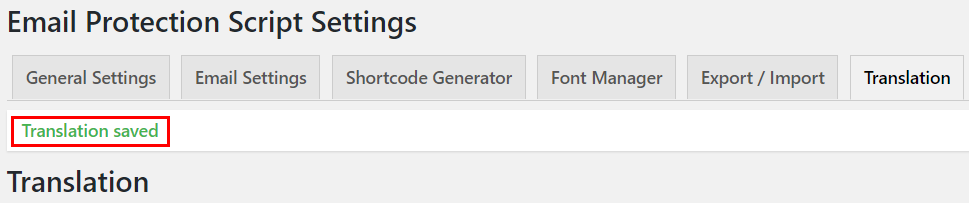
- Go to the "Translation" tab of the Admin Panel.
- Fill in the input fields with your translation of the corresponding phrases.
- After translating phrases click the "Save Changes" button at the bottom.
- After that the message "Translation saved" will be displayed at the top.
If you would like to clear all input fields for translating phrases, you can click the "Reset" button at the bottom.
![]()
If you want to apply your translation to the Script, you should select "Custom" in the Language field on the "General Settings" tab. Then click the "Save Changes" button. This is necessary for applying your translation on your website.

You can configure the Script according to the settings of you website.
If you are not logged in the Admin Panel of the Script, please log in as explained above.
To configure the Script, go to the "General Settings" tab of the Admin Panel.
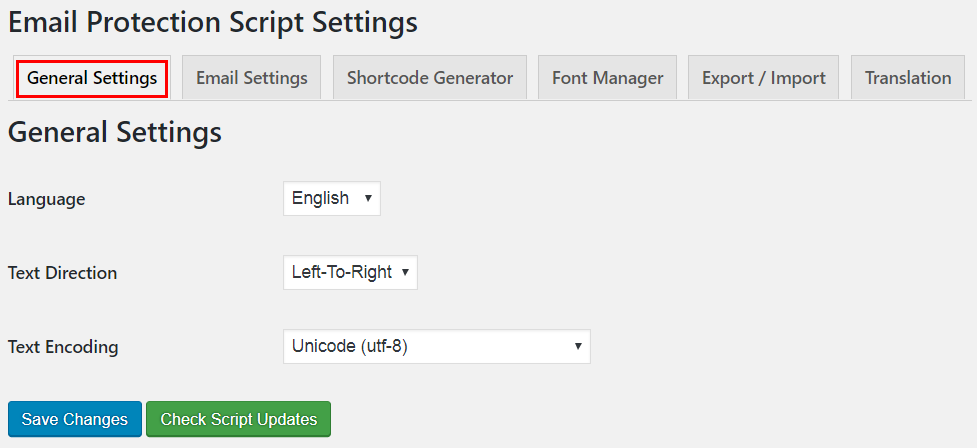
Here you can choose the following options:
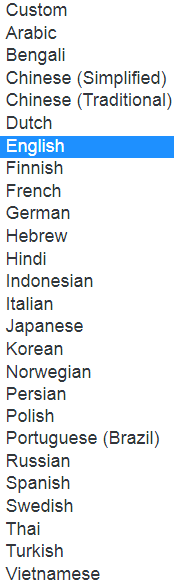
- Language (You can choose one of the listed languages that are included in the Script package: Arabic, Bengali, Chinese (Simplified), Chinese (Traditional), Dutch, English, Finnish, French, German, Hebrew, Hindi, Indonesian, Italian, Japanese, Korean, Norwegian, Persian, Polish, Portuguese (Brazil), Russian, Spanish, Swedish, Thai, Turkish, Vietnamese. If you want to choose your own translation, you should select "Custom" - more about this is explained above in the "Translation" section of this documentation.)
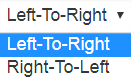
- Text Direction (You can choose LTR or RTL text direction according to your language)
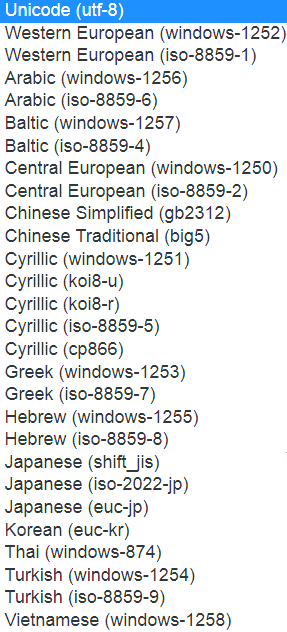
- Text Encoding (You can choose one of the listed text encodings according to the encoding of your website)
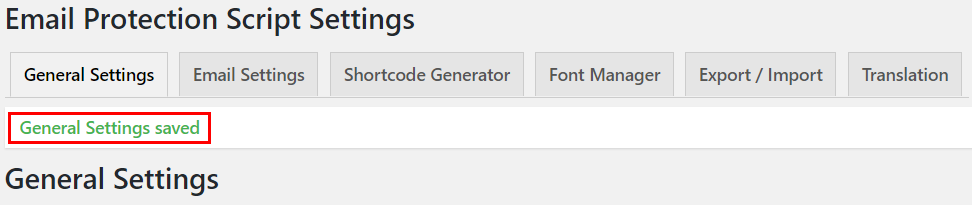
NOTE: After selecting the required options you should click the "Save Changes" button.
After that the message "General Settings saved" will be displayed at the top.
On the "General Settings" tab you can also check the Script updates as explained above.
The Script has very powerful settings. And you can adjust it according to your preferences.
If you are not logged in the Admin Panel of the Script, please log in as explained above.
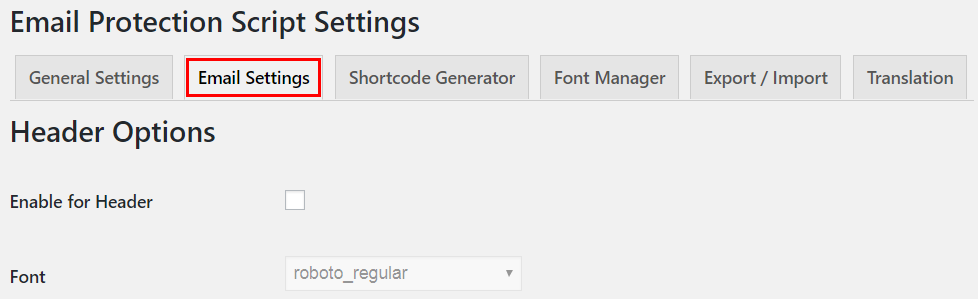
To adjust the Script, go to the "Email Settings" tab of the Admin Panel.
On the settings page you can choose options for each of these types of content:
- Header
- Footer
- Dynamically Added Content (It is the content that appears after the page loads. For example it may be the content that is added on the page via AJAX or via plain JavaScript.)
- Custom CSS Selectors Content (It is the content of certain HTML tags, classes, ids and other CSS selectors that you can choose)
- Entire Content (It is the content that is not included in any of the above types of content)
If you want to enable the script options for any type of content you should check the corresponding checkbox. NOTE: If the checkbox is not checked then the Script will not be applied to this type of content. By default the Script is disabled for all types of content.
For example if you want to enable the Script for Header you should check the checkbox "Enable for Header". After that you can see the preview of the test email with the chosen options. It is the instant preview that changes as soon as you change the options.
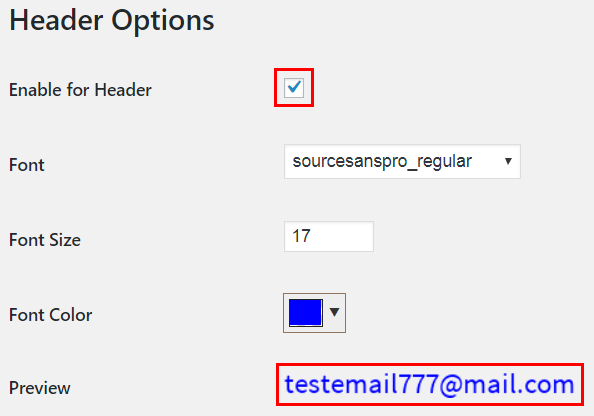
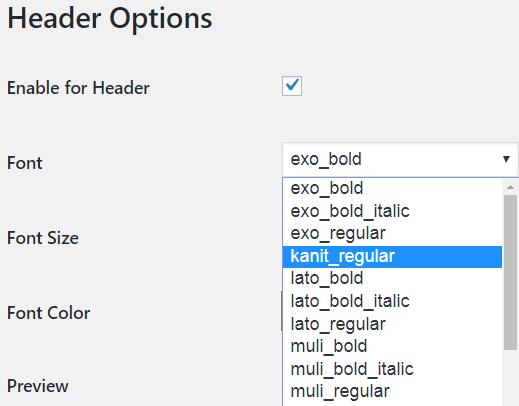
For each type of content you can adjust the following options:
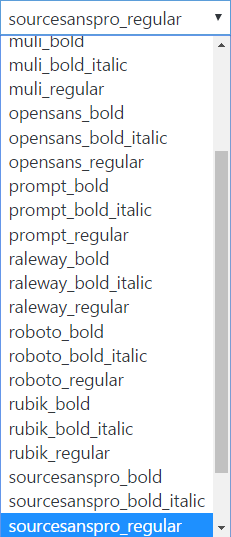
- Font (You can choose a font from the font list. For each font in the list there are its regular, bold and bold-italic variations. Also you can upload your custom fonts through "Font Manager" as explained below.)
- Font Size (You can set a numeric value from 5 to 73)
![]()
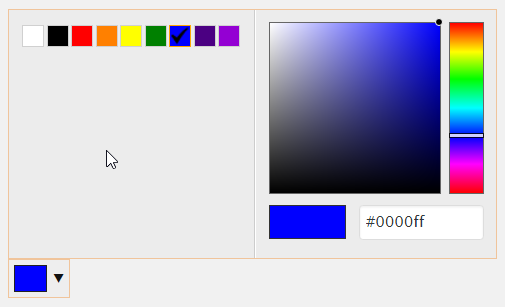
- Font Color (You can choose a color in the color selection box)
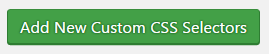
If you want to apply the Script to your Custom CSS Selectors Content you should click the "Add New Custom CSS Selectors" button.
You can add an unlimited number of Custom CSS Selectors sections. NOTE: If you want to enable the Script for Custom CSS Selectors Content, you should check the corresponding checkbox "Enable for Custom CSS Selectors...", after that you shoud fill in the "Custom CSS Selectors..." option with your CSS selectors (several different CSS selectors may be listed in one option). Then you can choose options for these CSS Selectors: Font, Font Size and Font Color.
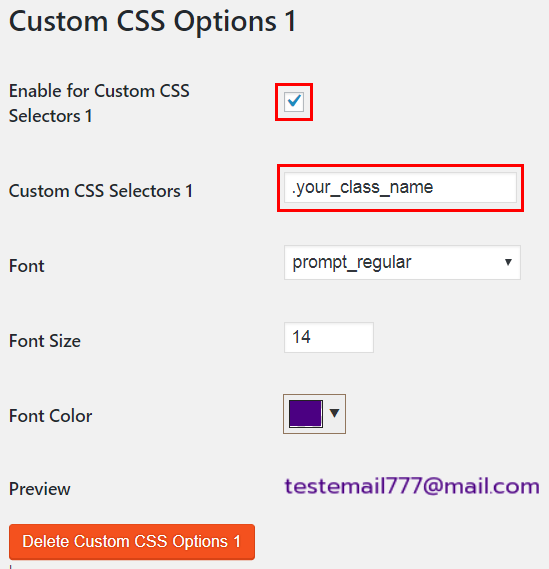
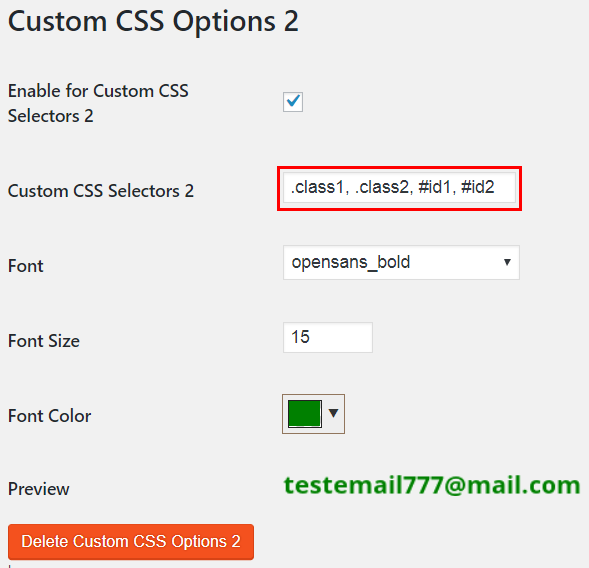
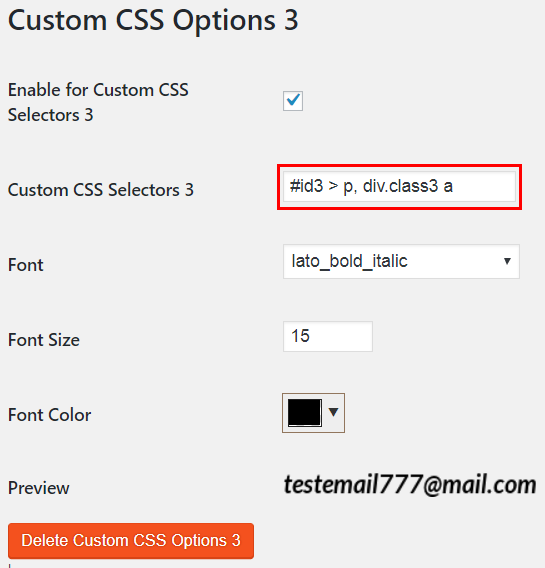
If you want to delete any Custom CSS Options section, you should click the "Delete Custom CSS Options..." button at the bottom of this section.
![]()
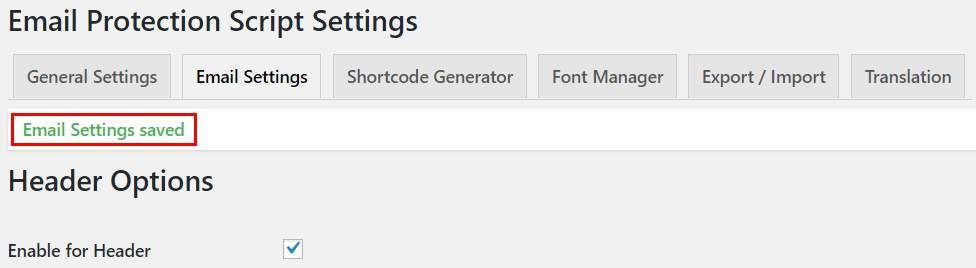
NOTE: After you finish customizing the script settings you should click the "Save Changes" button.
After that the message "Email Settings saved" will be displayed at the top.
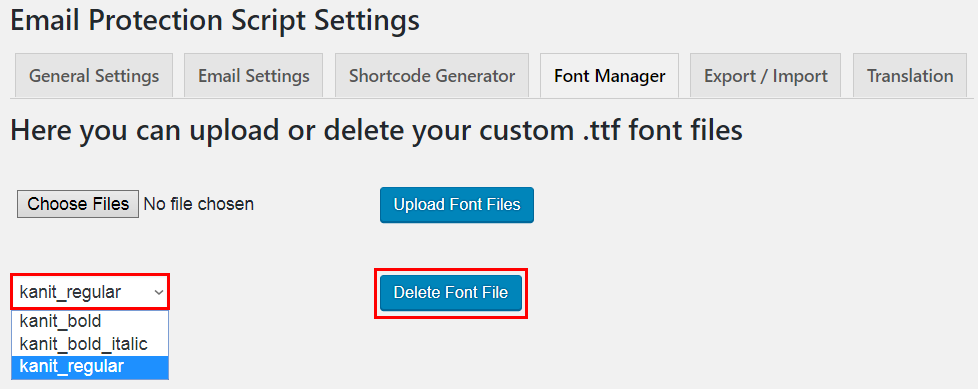
You can upload your custom fonts through the Font Manager. There are basic steps to upload your font files (with the extension .ttf):
- If you are not logged in the Admin Panel of the Script, please log in as explained above.
- Go to the "Font Manager" tab of the Admin Panel. Then click the "Choose Files" button.
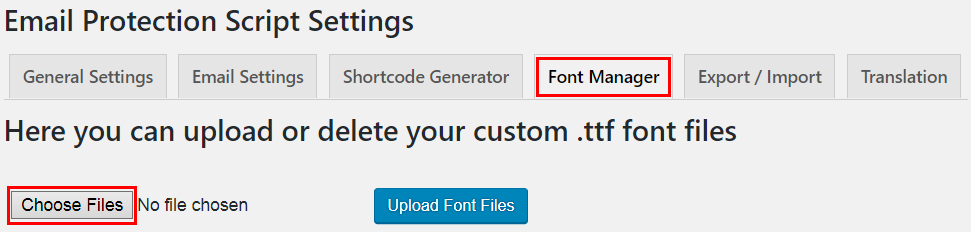
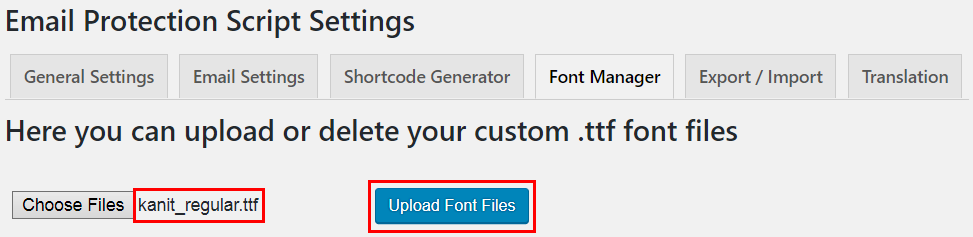
- In the opened dialog box choose your custom font files. NOTE: Your files must have the extension .ttf. For example the file can be named "kanit_regular.ttf".
- Click the "Upload Font Files" button.
- If it is OK, the message "This file has been uploaded successfully" will be displayed at the top.
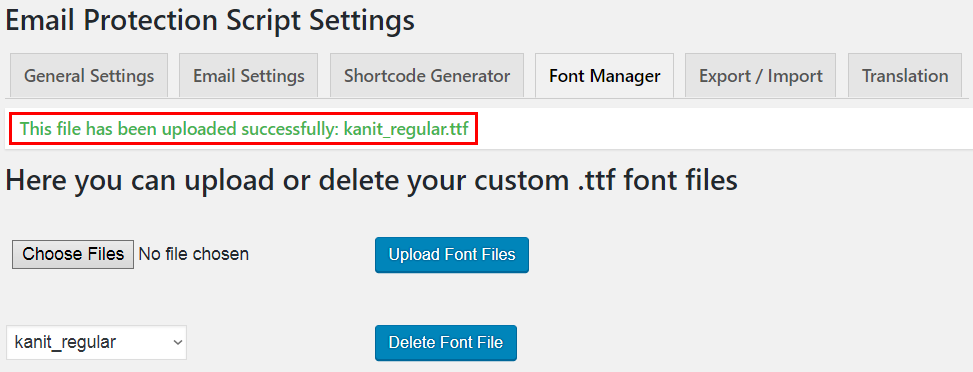
- After that your custom font will be added to the list of fonts in the "Font" options on the "Email Settings" tab of the "Email Protection Script Settings". And you can choose this font in the script options.
Also you can delete your uploaded font if you do not need it anymore. For example you want to delete the "kanit_regular" font. Just select this font from the drop-down list and click the "Delete Font File" button.
The Script comes with the handy Shortcode Generator through which you can create unlimited number of shortcodes. Shortcodes allow you to insert any protected email into your webpages.
If you are not logged in the Admin Panel of the Script, please log in as explained above.
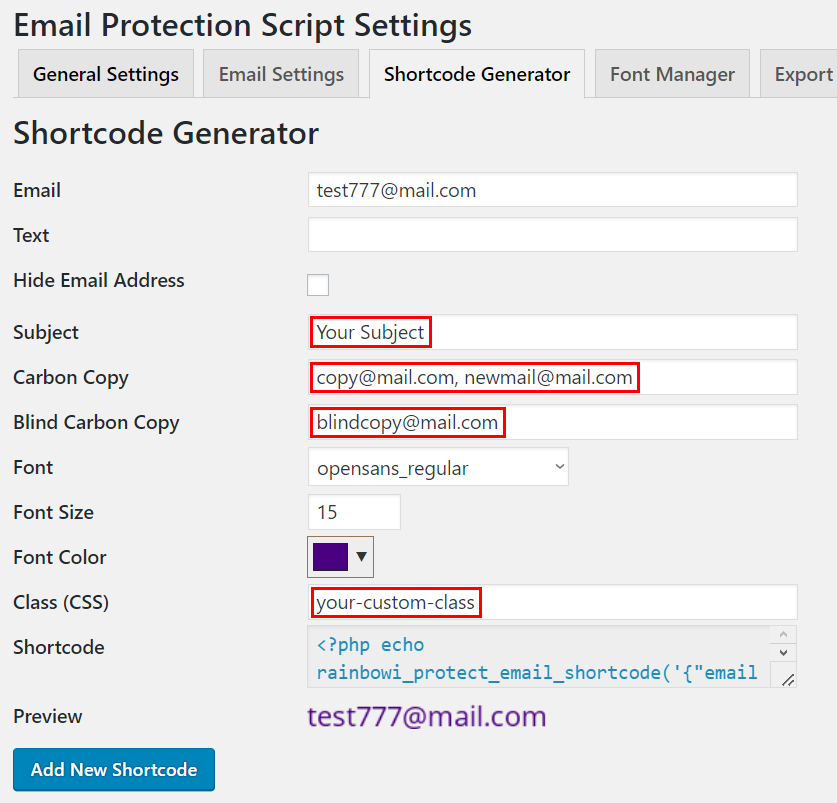
To add your shortcodes, go to the "Shortcode Generator" tab of the Admin Panel.
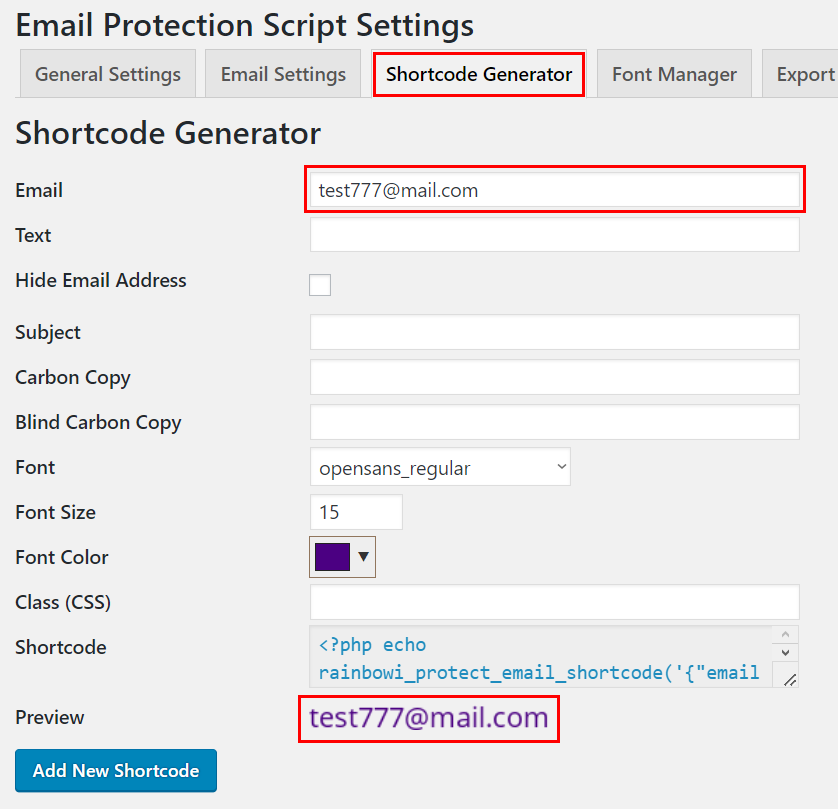
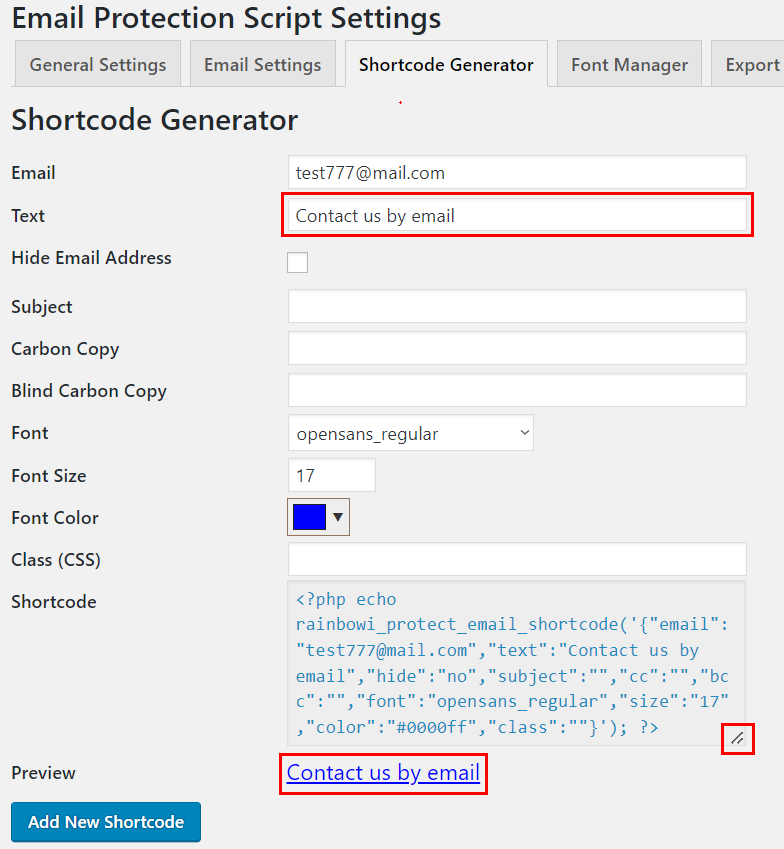
Here you should enter an email in the required field "Email". You can set Font, Font Size and Font Color in the corresponding fields. At the bottom you can see the preview of your email with the selected options. It is the instant preview that changes as soon as you change any option.
NOTE: When you click on the protected email (that is inserted into pages on your website through the shortcode), the email client window (for example "Outlook Express", "The Bat!" etc.) will be automatically opened with the "Email Address" field filled with your email.
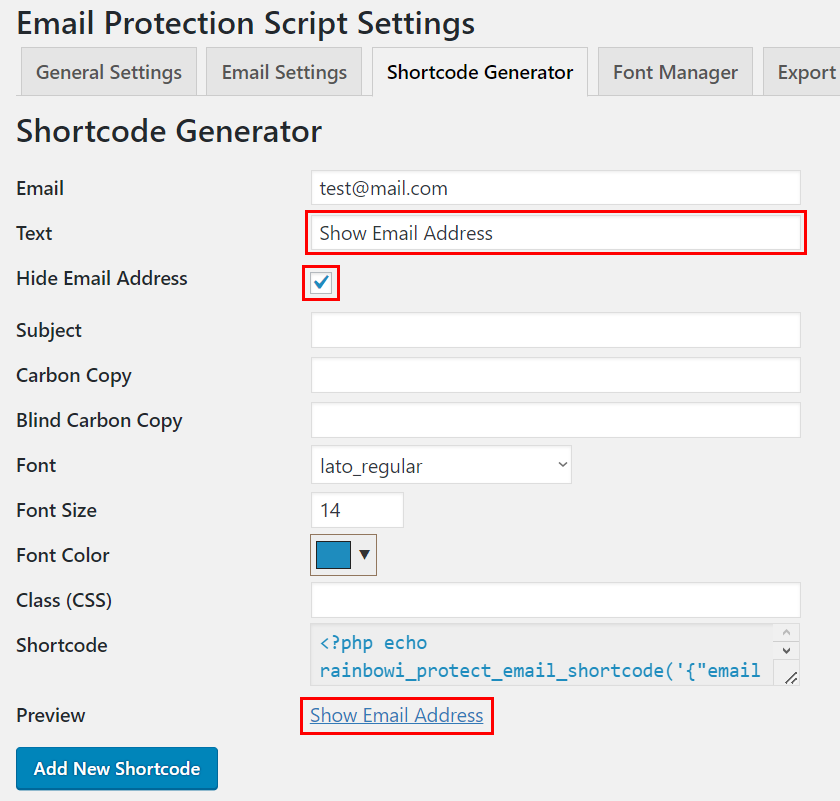
If you want to insert the clickable text link instead of the email itself you should enter your text in the "Text" field.
NOTE: The text will be displayed but when you click on this text link, the email client window (for example "Outlook Express", "The Bat!" etc.) will be automatically opened with the "Email Address" field filled with your email.
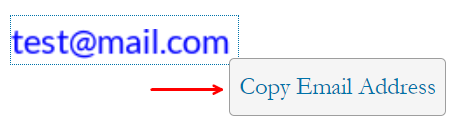
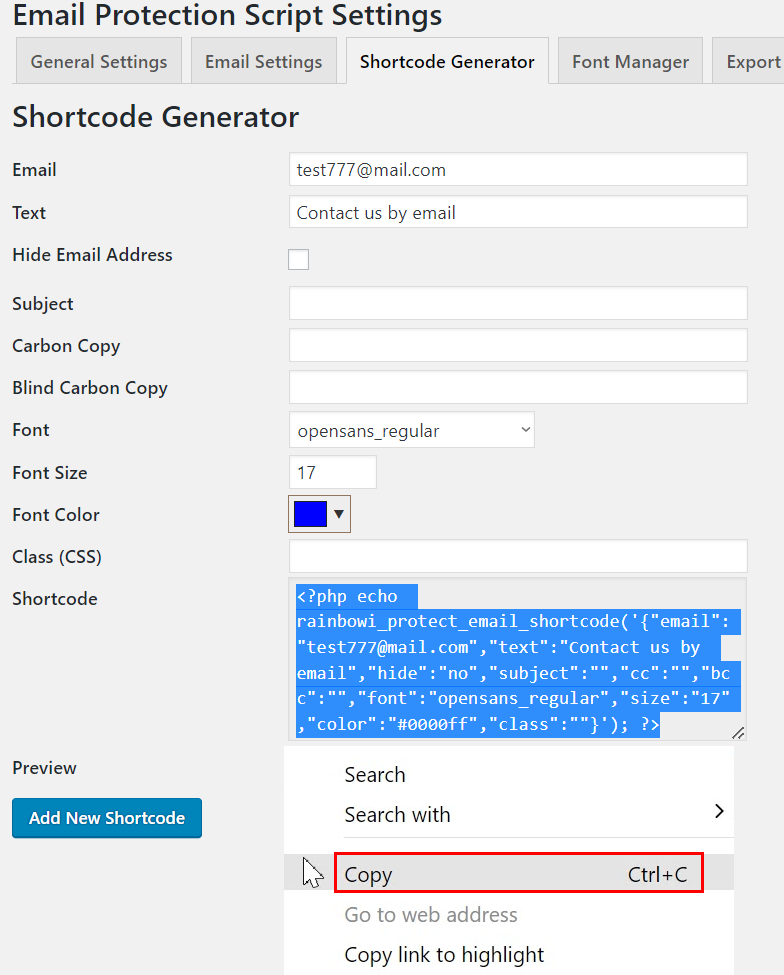
You can also copy the protected email address to the clipboard by clicking the right mouse button on it and then clicking the "Copy Email Address" item. And after that you can paste the copied email address where you want.
The "Shortcode" field is resizeable. You can resize it by pulling at its bottom right corner.
You can fill the "Subject", "Carbon Copy" and "Blind Carbon Copy" fields. In this case, when you click on the protected email, the email client window (for example "Outlook Express", "The Bat!" etc.) will be automatically opened with the "Subject", "Carbon Copy (CC)" and "Blind Carbon Copy (BCC)" fields filled.
Also you can fill the "Class (CSS)" field to add your custom CSS class to the protected email.
If you want to hide your email address from screen readers, you should check the checkbox "Hide Email Address" and enter your text in the "Text" field. In this case, the clickable text link will be displayed instead of the email address itself, but when you click on this text link, the protected email address will be shown. When you click on the shown protected email address, the email client window (for example "Outlook Express", "The Bat!" etc.) will be automatically opened with the "Email Address" field filled with your email (also "Subject", "Carbon Copy (CC)" and "Blind Carbon Copy (BCC)" fields can be filled automatically if you wish).
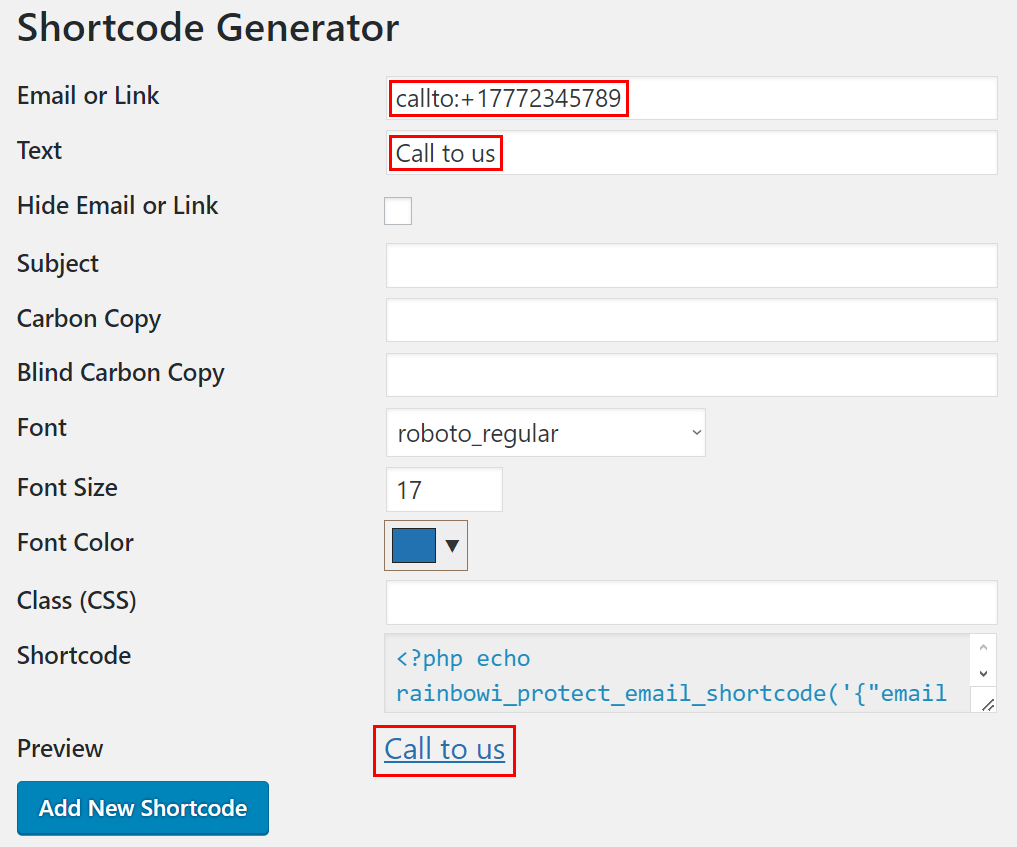
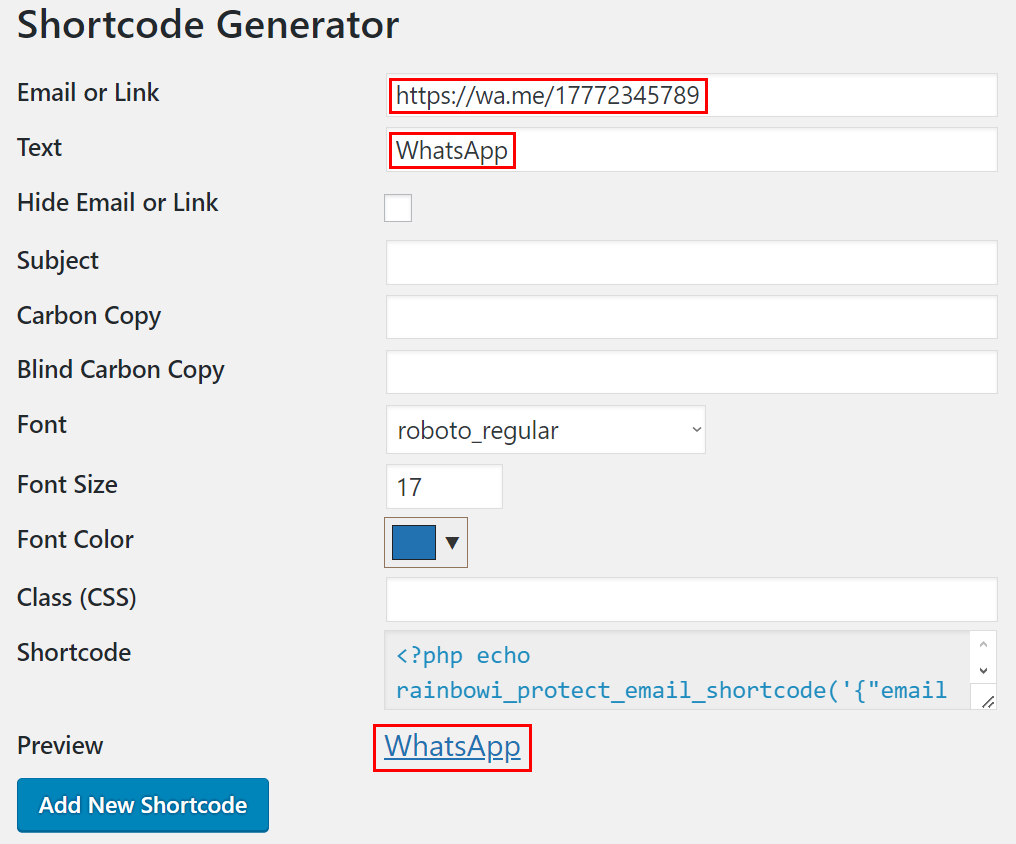
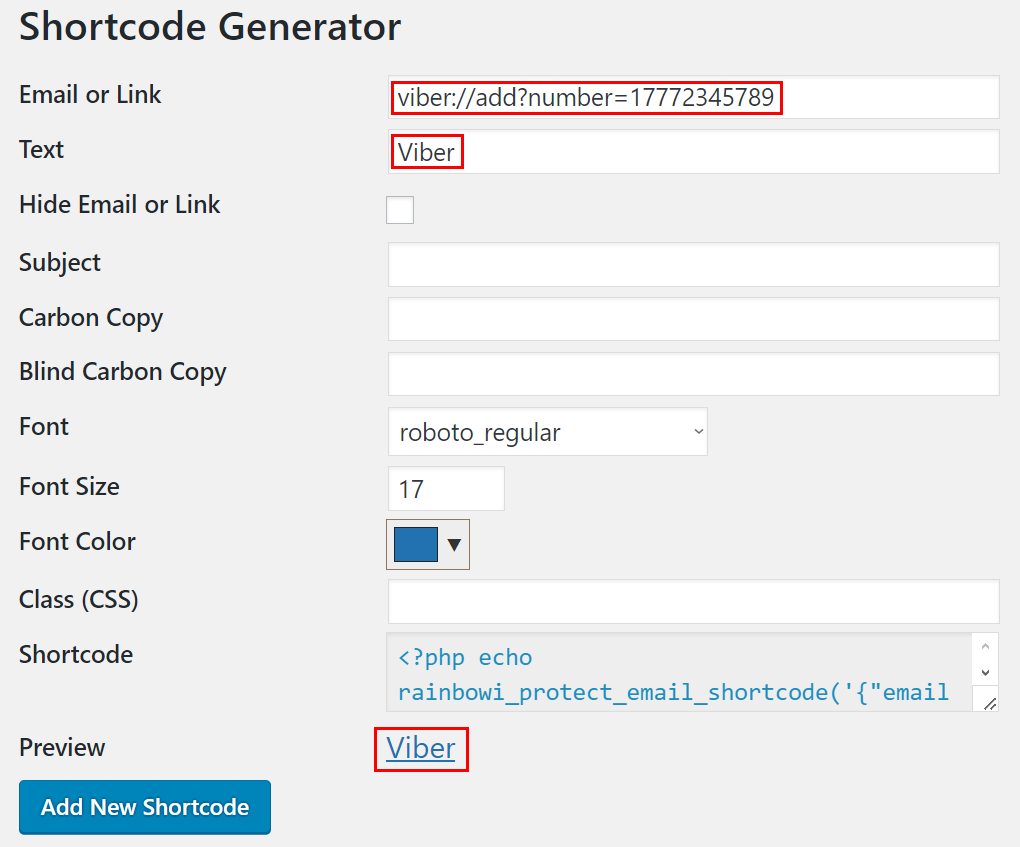
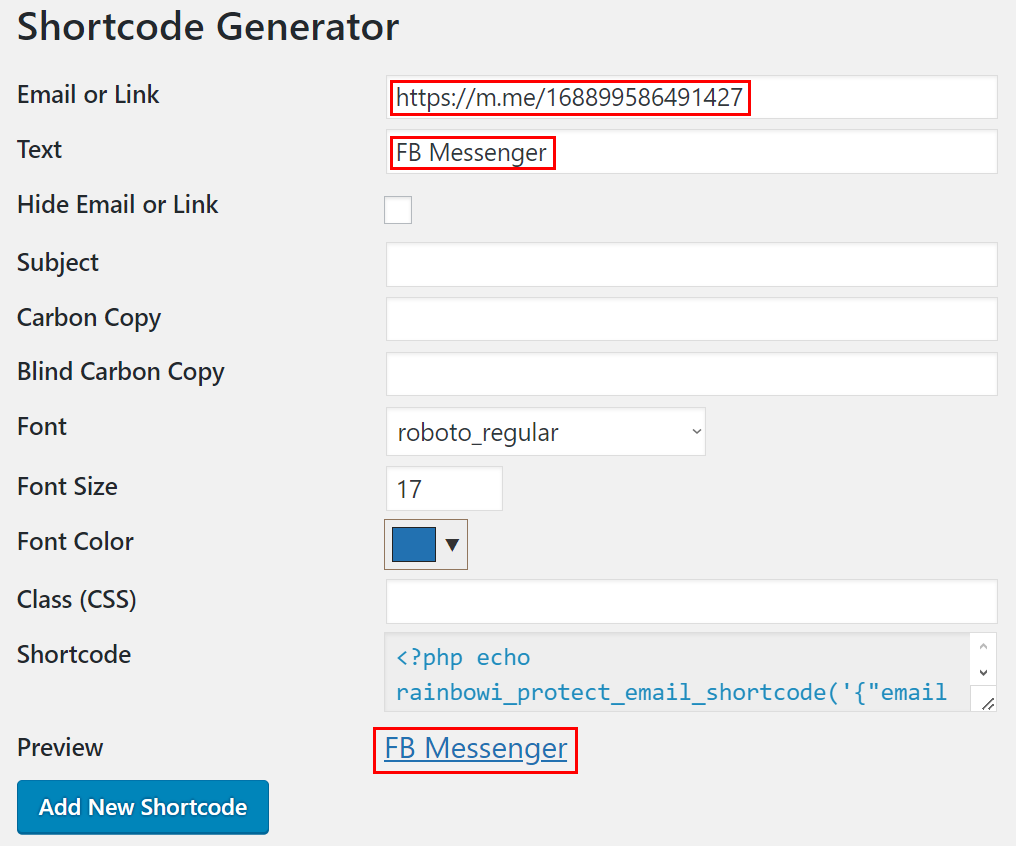
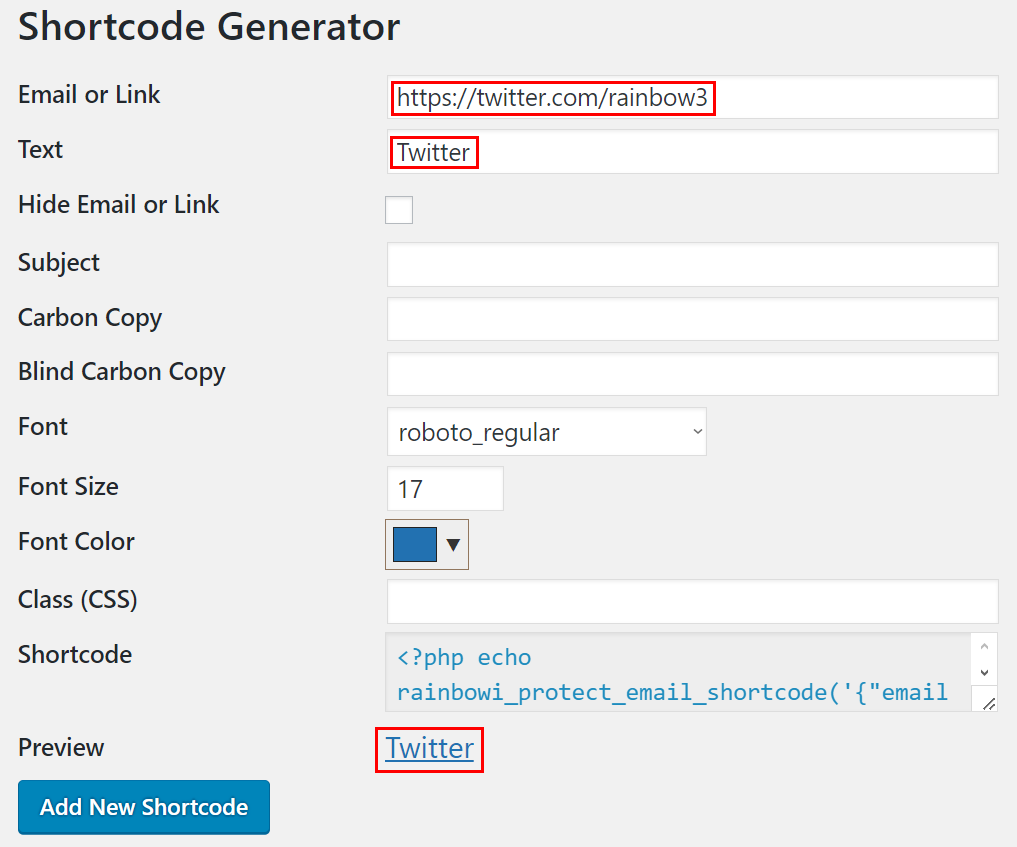
In addition to email addresses, you can also protect other contacts (phone numbers, messengers, social medias, etc.) and any links. Below are examples for a phone number, Telegram, WhatsApp, Viber, FB Messenger, Twitter and a custom link.


If you just want to add the shortcode to your page you can just copy the shortcode from the "Shortcode" field and paste it into your page. You should select the shortcode in the "Shortcode" field and then copy the selected shortcode by typing the "Ctrl+C" combination on the keyboard or by clicking the right mouse button and selecting the "Copy" item in the shortcut (context) menu. And after that you can paste the copied shortcode into your page.
If you also want to save the shortcode in the Shortcode List (for example, for using it in other pages), you should click the "Add New Shortcode" button.

After that the added shortcode will appear in the Shortcode List below, and the message "Shortcode added" will be displayed at the top.

In the Shortcode List you can sort your shortcodes alphabetically by the columns "Email" and "Text" by clicking on the title of the corresponding column.
Also you can search for any saved shortcode by its text or its email by typing a part of the text or the email into the corresponding field above the Shortcode List on the right.
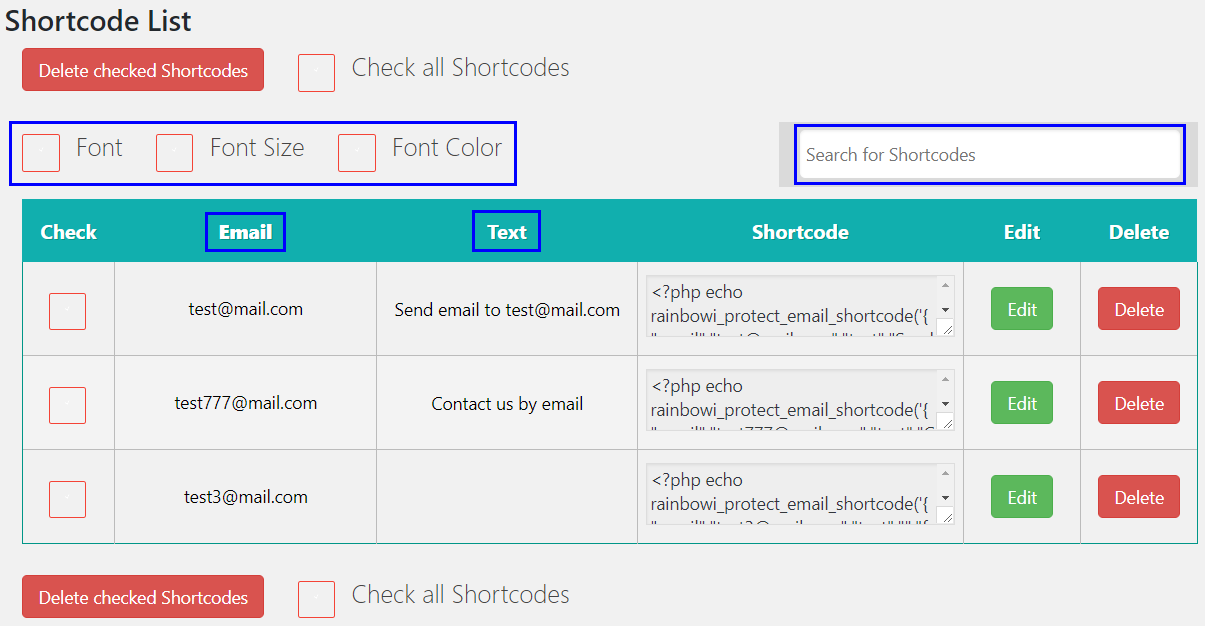
If you would like to customize the display of columns in the Shortcode List, you should check (or uncheck) the extra columns you want to display (the column names with the checkboxes are located above the Shortcode List on the left). Three columns are available: Font, Font Size and Font Color.
For example you can check all three available columns (Font, Font Size and Font Color). After that the added columns will be displayed in the Shortcode List.
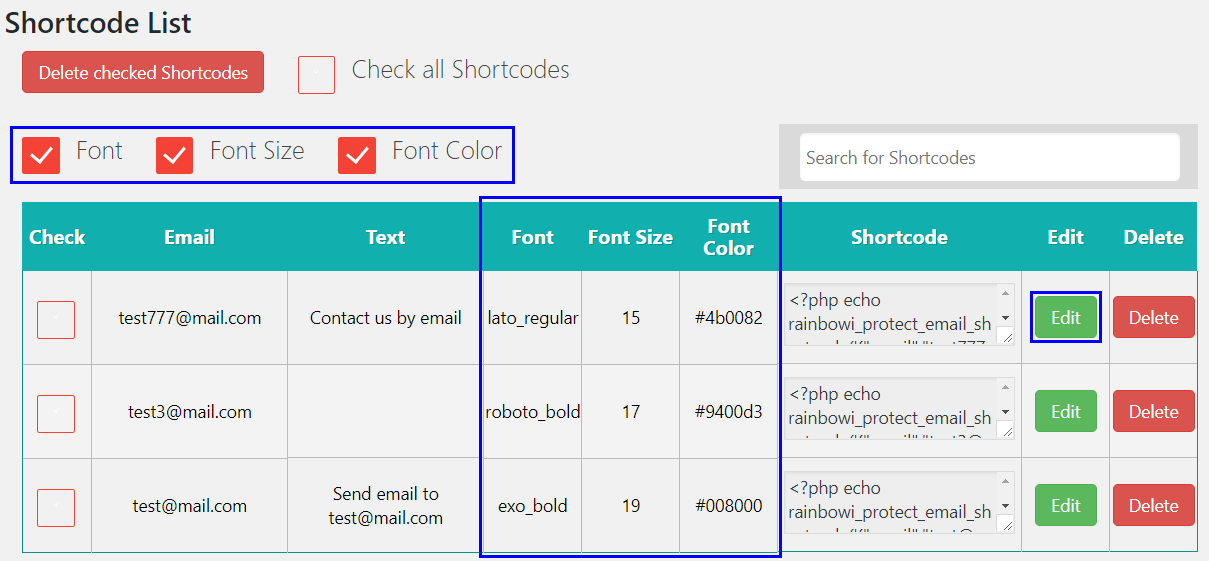
If you would like to edit the shortcode you should click the green "Edit" button near it in the Shortcode List.

After that the fields of the Shortcode Generator form will be filled with the data of the shortcode which is being edited, and the "Save Shortcode" and "Cancel" buttons will appear at the bottom of the Shortcode Generator form.
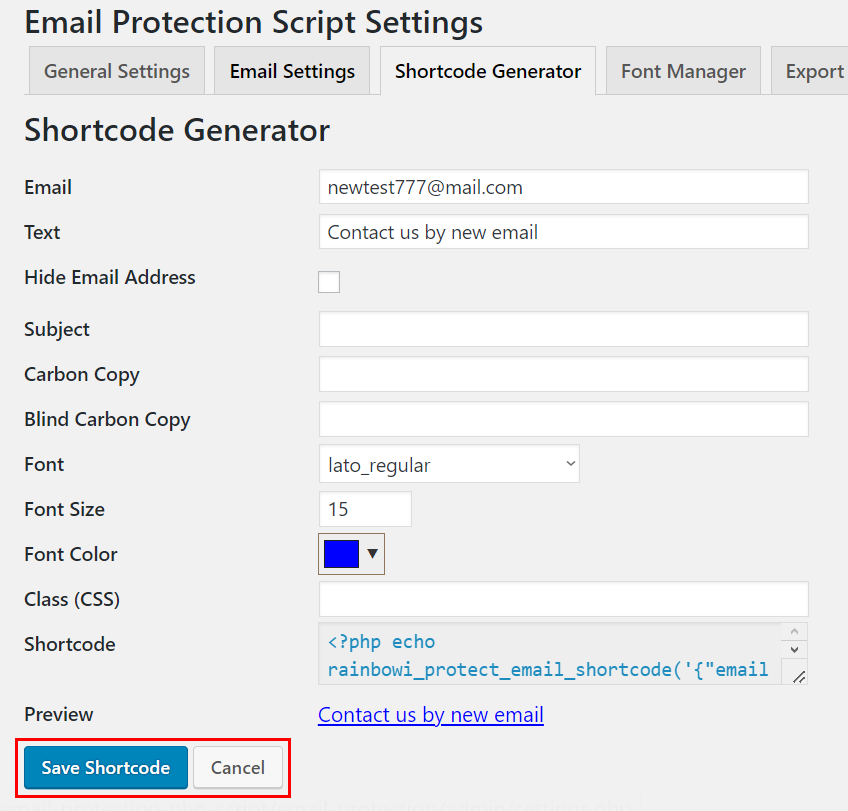
If you would like to cancel shortcode editing, you should click the "Cancel" button.
If you would like to save the edited version of the shortcode, you should click the "Save Shortcode" button. Then the edited shortcode will be saved in the Shortcode List, and the message "Shortcode saved" will be displayed at the top.

You can delete any shortcode from the Shortcode List. For deleting one shortcode you should click the red "Delete" button near it in the Shortcode List.

For deleting several shortcodes at once you should check shortcodes that you would like to delete in the Shortcode List and then click the "Delete checked Shortcodes" button.
This button is located above and under the Shortcode List. Both buttons "Delete checked Shortcodes" are identical, so you can click any one of them.
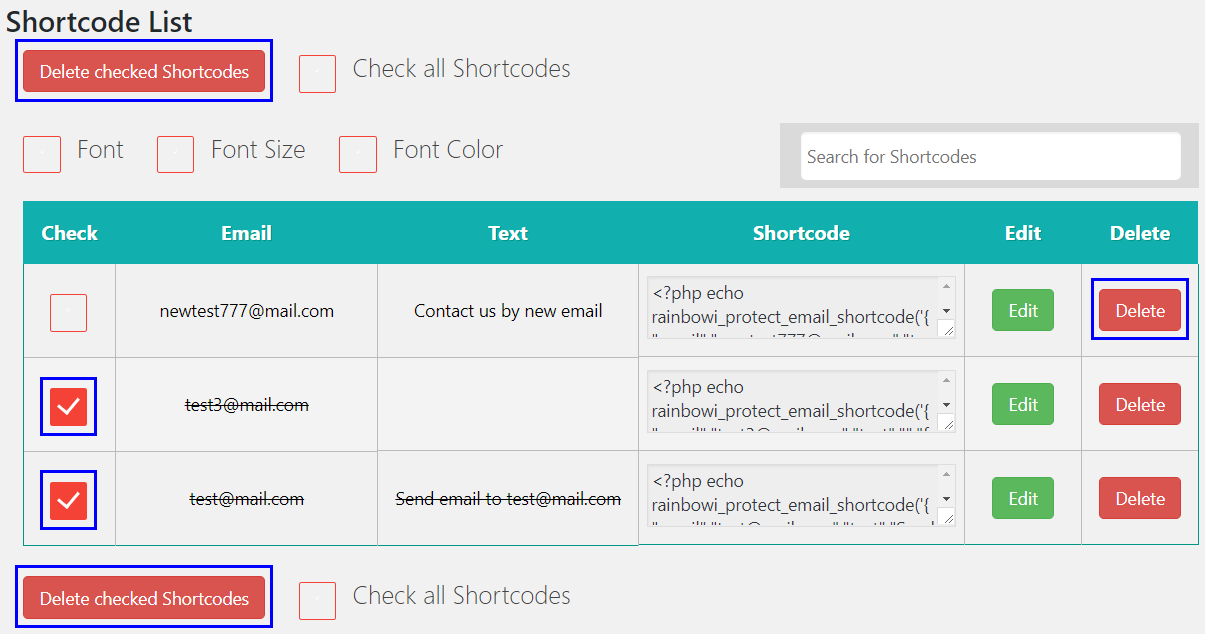
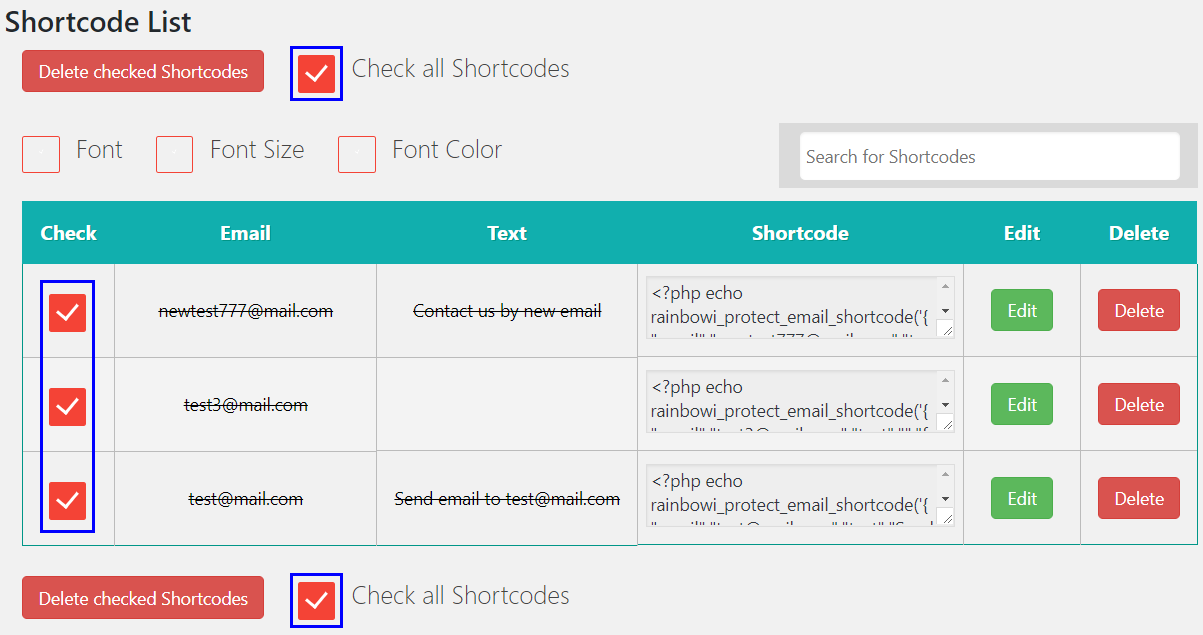
If you would like to check (or uncheck) all displayed shortcodes in the Shortcode List, you can check (or uncheck) the corresponding checkbox "Check all Shortcodes" at the top or at the bottom. Both checkboxes are identical, so you can check any one of them.
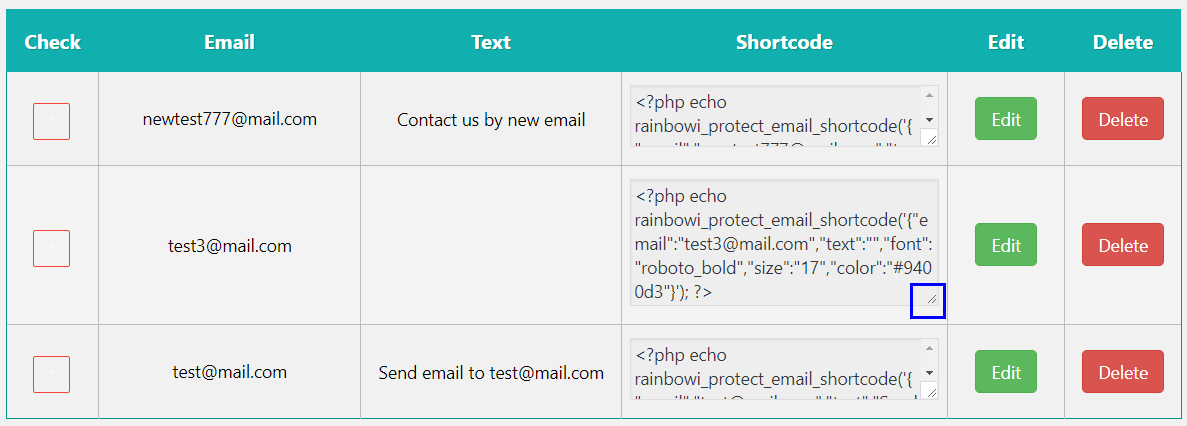
Each field in the Shortcode column is resizeable. You can resize it by pulling at its bottom right corner.
To insert the shortcode (from the Shortcode List) into pages on your website, you should select the corresponding shortcode in the Shortcode column in the Shortcode List and then copy the selected shortcode and paste it into your page. You can copy the selected shortcode by typing the "Ctrl+C" combination on the keyboard or by clicking the right mouse button and selecting the "Copy" item in the shortcut (context) menu.

You can export and import your settings and saved shortcodes, and move this data between websites.
If you are not logged in the Admin Panel of the Script, please log in as explained above.
Go to the "Export / Import" tab of the Admin Panel.
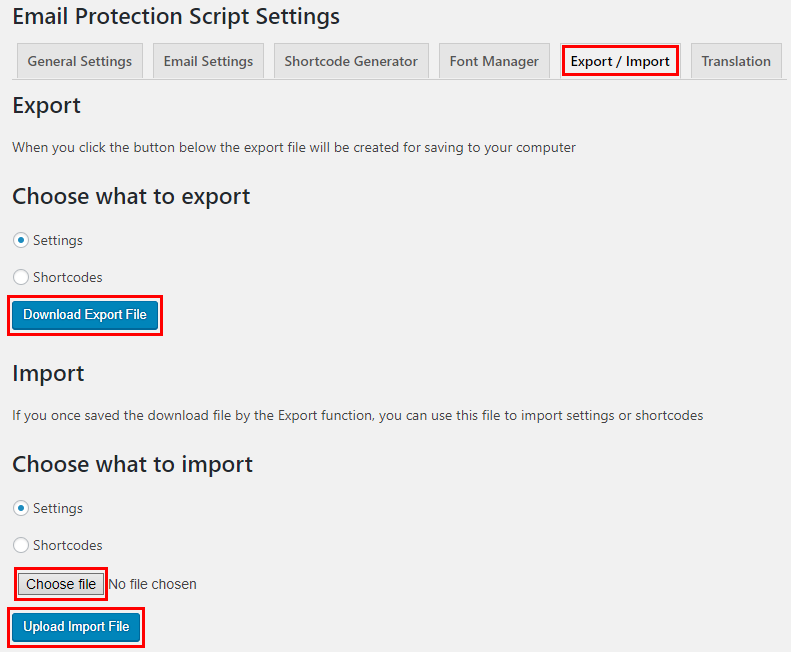
There are basic steps to export your data:
- Choose what you would like to export: Settings or Shortcodes.
- Click the "Download Export File" button.
- In the opened dialog box choose the folder on your computer where you want to save the data file.
- Then click the "Save" button in this dialog box.
There are basic steps to import your data:
- Choose what you would like to import: Settings or Shortcodes.
- Click the "Choose file" button.
- In the opened dialog box choose the data file from your computer (beforehand this file should have been saved by exporting).
- Click the "Upload Import File" button.
Version 4.0, May 21 2024
- Added the "DiDom" library
Version 3.0, November 23 2023
- Added protection of other contacts (phone numbers, messengers, social medias, etc.) and any links
Version 2.0, January 30 2023
- Added "Subject", "Carbon Copy", "Blind Carbon Copy" and "Class (CSS)" fields to the Shortcode Generator
- Added option "Hide Email Address" to the Shortcode Generator
- Added option "Copy Email Address"
- Added translation of new phrases for all available languages (.json translation files)
Version 1.0, September 14 2021
- Initial Release